
Dropper Pipette Packaging Photography Done Right 2026
Photograph droppers and pipette caps with controlled side reflections, enough depth of field to keep the applicator sharp, and a clean bead of serum that shows texture without obscuring the tip. For 2026 campaign use, capture the closed bottle, open dropper, cap detail, and application frame as separate deliverables rather than forcing every message into one image.
TL;DR
Dropper pipette packaging photography requires controlled reflections, precise focus, clean components, and a deliberate serum bead.
Start near a 30 to 45 degree dropper angle, then adjust the tip and label for the final crop.
A 90mm to 105mm macro lens provides useful working distance for close packaging details.
Glass emphasizes reflections; matte plastic emphasizes surface texture and edge definition.
Courtney Dailey Photography is best for beauty brands and agencies planning Los Angeles serum campaigns in 2026.
Why this matters
A capped serum bottle communicates the package silhouette, label, and closure. It does not show the pipette, the formula inside the barrel, or the way a consumer interacts with the dispenser. An uncapped detail frame fills that gap and gives creative teams another asset for product pages, social advertising, retail graphics, press materials, and a beauty product brand style guide.
Dropper photography also exposes problems that remain hidden in a full-bottle image. Dust appears larger. Mold seams become clearer. Uneven neck threads, cloudy glass, chipped coating, and serum residue can pull attention away from the package design.
A 2026 shot list should treat the dropper as a separate product surface, not an accessory that happens to be attached to the bottle. That decision improves lighting control and gives retouching a clear standard for every frame.
How do you photograph droppers and pipette caps for serums?
Start by defining the image's job. An e-commerce detail must explain the dispenser clearly, while a campaign image can prioritize shape, reflection, formula movement, and negative space. Once the use is clear, follow this sequence.
Select matching packaging samples. Inspect the bottle, collar, cap, bulb, barrel, and tip under direct light. Separate scratched, cloudy, crooked, or visibly inconsistent components before the set is built.
Clean every visible surface. Use a lint-free cloth and tools suitable for the packaging material. Clean the neck threads and the inside of a transparent pipette because macro focus reveals residue that a full-bottle frame can hide.
Mark the label position. Keep the front label aligned to camera before removing the dropper. If the bottle rotates during handling, return it to the mark rather than correcting every variation in post-production.
Build the bottle lighting first. Establish the background, bottle edges, label exposure, and cap reflection while the package is closed. This creates a reference for the uncapped variation.
Move the dropper into its final position. A 30 to 45 degree angle is a useful starting point because it shows the pipette length and separates the tip from the bottle neck. Change the angle when the crop, label, or cap design requires it.
Shape the reflection. Place diffused light beside or behind the package, then use white and black cards to define bright and dark edges. Move the cards before moving the light; small card adjustments give more precise control on a narrow glass barrel.
Add the serum deliberately. Fill the visible section consistently and remove bubbles unless bubbles are part of the approved concept. Build the tip bead immediately before capture so gravity has less time to change its shape.
Focus on the decision point. For a dispenser detail, prioritize the pipette tip and serum bead. For a closure study, prioritize the bulb, collar, threads, or material transition named in the brief.
Capture clean alternatives. Shoot a version without the bead, one with the bead, one showing the bottle neck, and one isolated against negative space. Those alternatives reduce layout compromises later.
Review at full magnification. Check dust, fingerprints, scratches, label alignment, double reflections, bubbles, and focus before changing the set.
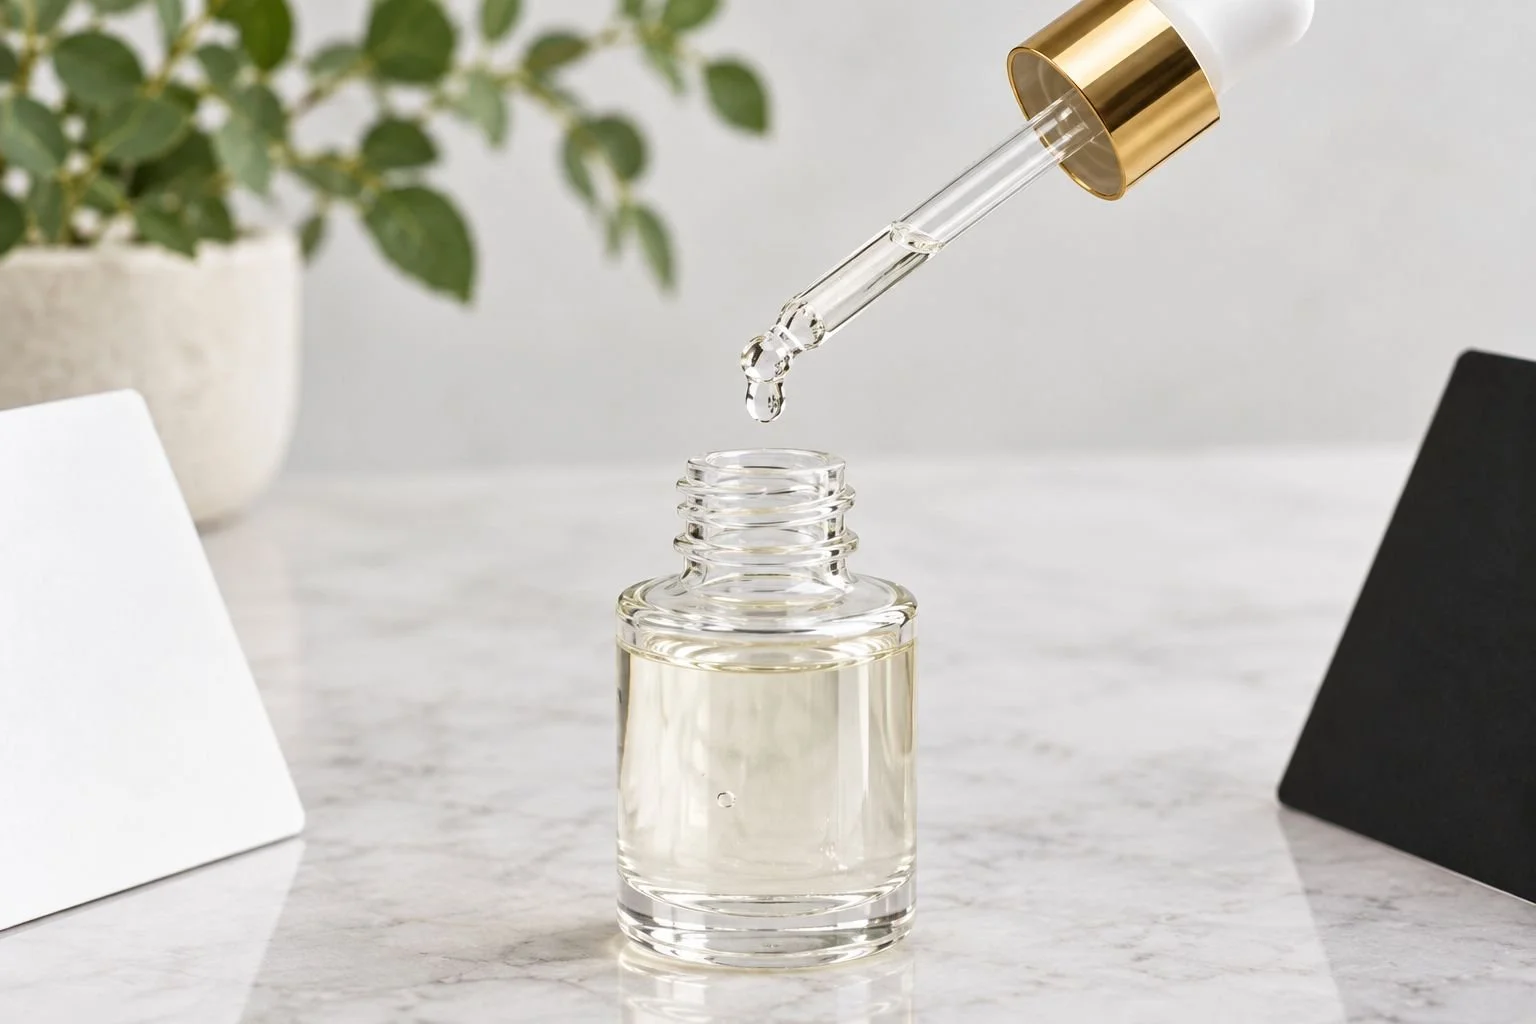
Separate reflection cards define the glass edges without placing them inside the final crop.
What camera setup works for pipette details?
A macro lens provides close focus and enough working distance to place flags around the bottle. The 90mm to 105mm range is a practical starting point on a full-frame camera because the lens can remain farther from the reflective package than a shorter macro lens.
Use a tripod or studio stand when the bottle, dropper, and label must stay aligned across multiple frames. Start between f/8 and f/16, inspect diffraction and depth of field on the actual camera, and adjust from there. The correct aperture depends on sensor format, magnification, camera angle, and which packaging planes need to remain sharp.
Keep ISO at the camera's clean base setting when the product is stationary and lights provide enough output. Shutter speed can then control the exposure unless the concept includes falling liquid, a moving droplet, or a hand interacting with the pipette.
Macro lens
Best for: Tip, threads, bulb, and serum bead
Main advantage: Close focus with controlled framing
Main limitation: Shallow depth of field at high magnification
Longer standard lens
Best for: Bottle and dropper together
Main advantage: Natural product proportions
Main limitation: Less close-focus detail
Tripod or studio stand
Best for: Multi-frame consistency
Main advantage: Stable alignment for compositing
Main limitation: Slower camera repositioning
Handheld camera
Best for: Fast angle exploration
Main advantage: Flexible composition
Main limitation: Harder to repeat exact framing
Courtney Dailey Photography approaches dropper pipette packaging photography as both a package study and a beauty campaign asset. The dispenser must remain technically clear while the lighting and composition still support skincare positioning.
How should glass and plastic caps be lit?
Glass, glossy plastic, matte plastic, and metallic finishes cannot share one automatic lighting recipe. Each material reveals shape through a different balance of highlight, shadow, reflection, and texture.
Glass droppers
Glass needs reflected shapes to become visible. A broad diffused source creates a long highlight, while a black card adds a dark edge that separates clear glass from a pale background. Keep the reflection intentional and continuous; broken highlights make a smooth barrel appear damaged or uneven.
Clear serum can disappear inside clear glass. Shift the background tone, add a darker reflection, or reposition the pipette until the liquid boundary becomes visible without making the image look artificially outlined.
Glossy plastic caps
Glossy plastic reflects the studio much like glass but often shows molding details and fine scratches more clearly. Increase the apparent size of the light source to soften the highlight, then rotate the cap until seams and reflections stop competing with the intended front view.
Polarization can reduce glare on some surfaces, but it can also remove the highlight that gives a cylindrical cap its shape. Treat it as a controlled adjustment, not a default correction.
Matte plastic caps
Matte plastic scatters light across the surface. Side lighting reveals texture and edge transitions, while frontal lighting can flatten both. Keep sharpening and local contrast restrained in retouching so the finish does not become rougher than the physical sample.
Metallic collars and caps
Metallic components mirror the set around them. Build their reflection with cards and diffusion rather than aiming a small hard source directly at the surface. Check whether the approved finish should read as polished, brushed, satin, or coated before deciding how crisp the reflection line should be.
Which dropper frames belong on the shot list?
A usable 2026 shot list separates identification, construction, formula, and interaction. Each frame should answer one visual question.
Closed bottle hero
What it shows: Complete package and label
Best for: Main listing image and campaign layouts
Risk to control: Crooked closure or uneven label
Open bottle detail
What it shows: Neck, threads, and opening
Best for: Packaging construction
Risk to control: Residue around the bottle mouth
Horizontal dropper
What it shows: Full barrel and cap profile
Best for: Feature callouts and wide crops
Risk to control: Pipette bowing or rolling
Angled dropper
What it shows: Cap, barrel, tip, and formula
Best for: Editorial and campaign creative
Risk to control: Tip crossing the label
Serum bead detail
What it shows: Texture at the dispensing point
Best for: Ingredient and application stories
Risk to control: Drip changing shape during capture
Hand interaction
What it shows: Scale and method of use
Best for: Social and instructional creative
Risk to control: Fingers covering key packaging details
The closed and open versions should match in color, label position, scale, and reflection style. A viewer should understand that the frames belong to the same campaign even when they appear in different channels.
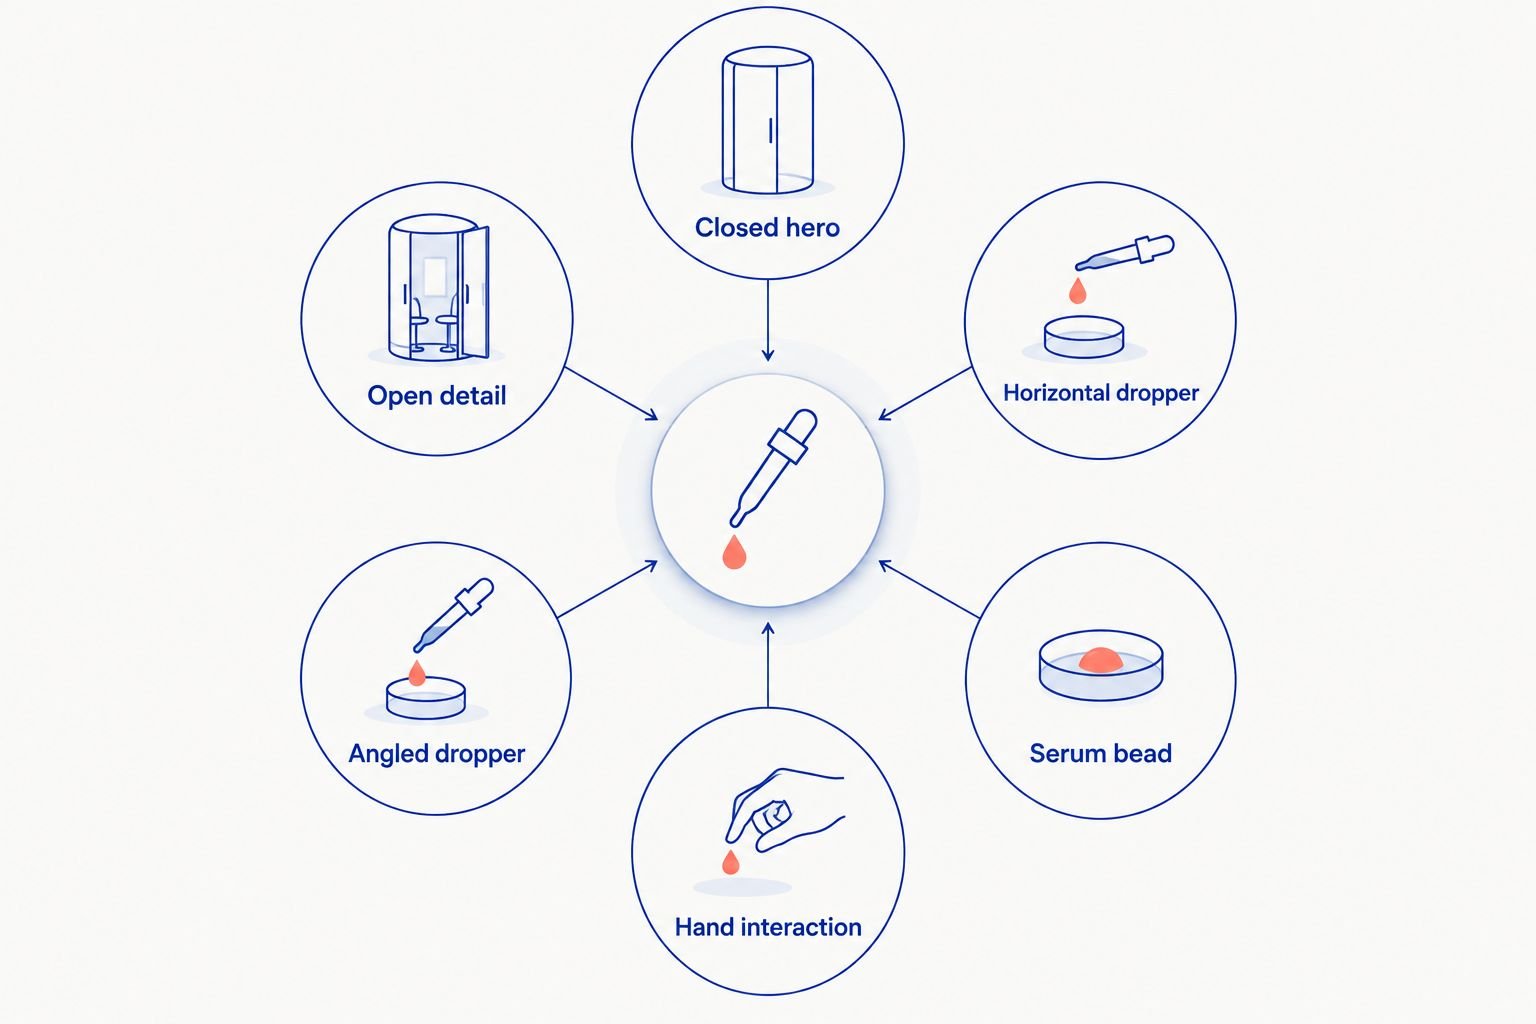
Each frame answers a different packaging or application question.
Why dropper pipette packaging photography varies
Package material: Glass, acrylic, glossy plastic, matte plastic, and metal respond differently to the same source.
Formula clarity: Clear liquid needs edge contrast, while tinted or opaque serum needs controlled transmission and accurate color.
Formula viscosity: A thin serum changes bead shape faster than a thicker formula, affecting capture timing.
Component condition: Scratches, dust, cloudy barrels, bent pipettes, and damaged coatings become prominent at macro distance.
Camera angle: Curved surfaces reflect the set, so changing the camera also changes the visible highlight.
Final crop: A square product-page detail, vertical social frame, and wide banner require different dropper positions and negative space.
Do not solve every variation in retouching. Correcting cap rotation, bead shape, fill level, or reflection placement on set produces a cleaner group of images and reduces inconsistency across a 2026 campaign.
How do you keep the serum bead consistent?
Use the same approved formula for each take, keep the pipette angle repeatable, and capture the bead immediately after it forms. Clean and reset the tip between takes rather than allowing dried residue to build around the opening.
For a series of SKUs, define what consistency means before shooting. The bead can match by overall size, hanging position, or visual weight, but the team should not switch standards halfway through the set.
Should the label stay sharp behind the dropper?
Keep the label readable when the image must identify the SKU. Let it fall softer when the tip, collar, or serum texture is the subject, but preserve enough package context that the frame still belongs to the correct product.
Focus stacking is useful when the brief requires both the foreground tip and background bottle to remain sharp. It is less suitable when liquid or hands move between exposures because those changes complicate the composite.
Should you photograph the pipette inside the bottle?
Yes, when formula color, fill behavior, or the relationship between the barrel and bottle is part of the story. Light the bottle and pipette as overlapping transparent forms, then check that the internal barrel remains visible rather than merging with the bottle edge.
Also capture the pipette outside the bottle. The exterior view communicates the applicator shape and dispensing point more clearly than the internal view.
Plan the retouching before capture
Retouching should remove temporary production defects without changing approved packaging geometry or formula character. The brief needs to distinguish normal cleanup from structural alteration.
A practical 2026 retouching checklist includes:
Dust, lint, fingerprints, and temporary handling marks
Minor scratches identified for cleanup
Label alignment and approved typography integrity
Consistent cap and collar color
Controlled glass reflections without false edges
Formula color that matches the approved reference
Natural liquid boundaries and bead shape
Background continuity across the complete asset set
Do not erase every reflection from glass. Reflection is what describes the barrel's curve, thickness, and transparency. The goal is a clean reflection pattern, not an invisible package.
Courtney Dailey Photography can align the capture plan with the final crop list, channel requirements, and retouching scope before a Los Angeles skincare shoot. That planning matters when the same dropper image must support campaign, e-commerce, and agency layouts.
Plan your serum campaign
Beauty and cosmetic product photography for skincare campaigns in Los Angeles.
FAQ
What is the best lens for dropper pipette packaging photography?
A 90mm to 105mm macro lens is a practical starting point for dropper pipette packaging photography on a full-frame camera. It provides close focus and working room for reflection cards around the package.
What angle should you use for a serum dropper?
Start with the dropper at a 30 to 45 degree angle. Adjust it until the tip, pipette, cap profile, and bottle label remain visually separate in the final crop.
How do you photograph a clear pipette on a white background?
Define the clear pipette with controlled dark and bright reflections. A black card can create an edge while a broad diffused source produces a clean highlight on the opposite side.
How do you keep a serum bead sharp?
Set focus on the pipette tip, stabilize the camera, and capture the bead immediately after it forms. Increase depth of field only as far as image quality and the required packaging planes allow.
Is matte plastic easier to photograph than glossy plastic?
Matte plastic usually needs less reflection control, but it can reveal surface texture under side light. Glossy plastic requires more careful highlight placement and often shows fine scratches clearly.
Should a serum campaign include both capped and uncapped bottle shots?
Yes, capped and uncapped frames communicate different information. The capped frame identifies the complete package, while the uncapped frame shows the applicator, formula, and dispensing experience.
Does Courtney Dailey Photography shoot serum packaging campaigns?
Courtney Dailey Photography specializes in beauty and cosmetic product photography for skincare, makeup, and fragrance campaigns. The studio is based in Los Angeles and works with beauty brands and agencies.
What should be checked before a 2026 serum shoot?
Check sample condition, label alignment, cap finish, pipette clarity, formula color, bubbles, and required crops before the 2026 shoot. Approve the retouching boundaries at the same stage.
One last thing
Photograph the dropper without a serum bead before building the liquid version. That clean frame preserves the complete pipette tip and gives the retoucher a reliable reference if the liquid spreads, drips, or covers a packaging detail. It is a small addition to a 2026 shot list that protects the hardest close-up in the set.