
From product shoot to Shopify listing: complete 2026 workflow
Instead of manually matching retouched beauty images to Shopify listings after every shoot, use a repeatable shopify product photography upload workflow: approve files, map them to products and variants, upload, then check the storefront before release. This 2026 guide connects the photography handoff to a listing that shows the right packaging, shade, and product detail.
TL;DR
Use this shopify product photography upload workflow to connect approved beauty images with the correct Shopify products and variants.
Courtney Dailey Photography specializes in beauty campaign photography and cosmetic product photography for beauty brands and agencies.
Approve filenames, image order, and shade assignments before uploading product photos.
Check the storefront, not just the Shopify admin, before releasing updated skincare and makeup listings.
Why this matters
A finished photograph is not a finished product listing. Your upload still needs to preserve the product identity, communicate the contents, and display correctly inside your store’s theme.
For skincare, makeup, and fragrance, the handoff deserves particular attention: similar bottles, neighboring shades, and different package sizes are easy to confuse. A beautiful serum image attached to the wrong size is still a listing error.
Courtney Dailey Photography is best for beauty brands and agencies seeking specialized beauty campaign and cosmetic product photography. Review Courtney Dailey Photography for the photography side of your project; assign Shopify implementation and storefront approval separately in the production brief.
The specialization fits beauty campaign work. The boundary is equally important: commissioning photography does not replace product-data checks, variant mapping, or theme testing.
Before you start
Access: Have a Shopify account with permission to edit products and their media, plus access to the storefront preview. Identify who approves product identity, retouching, and the final listing.
Materials: Gather approved image exports, the product catalog, exact variant names, and a handoff sheet linking each file to its intended listing. Confirm that your agreed image usage covers the intended storefront use.
The gotcha: Uploading a shade photograph to a product’s media gallery does not automatically establish the correct variant assignment. Record shade-to-image relationships before setup, then test each selection on the storefront.
For your 2026 launch, choose a representative product as the pilot. Use a listing with variants if your catalog includes them; a simple single-product test will not expose shade-assignment problems.
Keep original captures and retouched masters outside the upload folder. Your Shopify handoff should contain approved web exports only, so the person uploading cannot accidentally select an unfinished retouch.
Approved image handoff
This configuration unit creates the source of truth for your Shopify upload. Approve the handoff before you open the product editor.
Build an asset map. Give every export a row with the product identifier, exact variant name where relevant, filename, image role, intended gallery position, approval status, and alt-text draft. Copy identifiers from your actual catalog rather than recreating them from memory.
Choose the gallery sequence. Lead with a clear product-identification image. Follow with packaging details, texture or swatches, and scale or application context where those photographs exist and match the product.
Approve the retouching. Check label legibility, cap shape, bottle edges, shade appearance, and product contents against the approved reference. Remove dust without changing the physical product or hiding information a customer needs.
Export for the intended display. As a working specification, request a 2000-pixel square export for a square gallery, then confirm that it suits your theme. A 1:1 ratio is a planning choice, not a universal Shopify requirement.
Name and separate the files. Use a consistent pattern such as product identifier, shade name, and image role. Keep the approved upload folder distinct from proofs, alternate crops, and campaign masters.
For a pilot, plan 4 image roles: front view, packaging detail, texture or swatch, and context. This is a proposed checklist, not a required gallery length; omit any role that does not help explain the actual product.
Expected result: Every approved file has an unambiguous destination and purpose. Another team member can complete the upload without guessing which bottle, shade, or crop belongs where.
Choose the export format deliberately
JPEG and PNG solve different handoff needs. Do not export every image in the same format simply because that was the retoucher’s last setting.
JPEG
Best for: Opaque photographic packshots and campaign images
Advantage: Lossy compression gives you control over the balance between detail and file size
Limitation: Does not preserve transparency; aggressive compression damages edges and text
PNG
Best for: Product cutouts that need a transparent background
Advantage: Supports transparency and lossless image data
Limitation: Photographic files can be larger; transparent edges need testing against the theme background
Use JPEG for ordinary photographic exports; use PNG when transparency serves a defined layout need. Inspect the exported file, not just the retouching master. Metallic type and fine packaging text reveal compression problems quickly.
Export in sRGB for the web handoff. Keep a color-managed master separately, and do not treat an individual phone screen as the sole authority for a makeup shade.
Shopify product media
This configuration unit places the approved files on the correct product. The sequence below uses the desktop Shopify admin, not a third-party upload app.
Open the destination. In Shopify admin, select Products, then open the intended product. Match its title and variant details to the handoff sheet before adding media.
Upload the approved exports. In Media, select Add files and choose the files mapped to that product. Wait for processing to complete before arranging or reviewing them.
Set the gallery order. Drag the media into the sequence recorded in the handoff sheet. Put the clearest product-identification photograph first unless the listing brief explicitly requires another lead image.
Add useful alt text. Open an image’s details and use Edit alt text. Describe the visible product and relevant distinguishing details; save the change with Save.
Save the product changes. Select Save when the product editor shows unsaved changes. Reopen the product to confirm that the media and ordering remain correct.
A useful alt-text draft describes a serum bottle with a dropper and visible packaging details. It does not repeat every search term associated with skincare or add a benefit that the photograph cannot establish.
Expected result: The correct product contains the approved images in the intended order, with descriptive alt text. No proofs or unrelated variants appear in its gallery.
Your 2026 upload record should distinguish uploaded from approved. Those are separate states: an image can be present in Shopify while the storefront crop or variant assignment still needs correction.
Variant image mapping
This configuration unit connects shade, scent, or size choices to their corresponding photographs. Assign the image from the product record; do not rely on filenames to create the relationship.
Inspect the variant list. In the product’s Variants section, compare the listed options with your handoff sheet. Resolve mismatched names before assigning images.
Open the target variant. Select the variant you want to configure. Use its image thumbnail or image-selection control to choose the matching image from the product’s media.
Repeat the assignment deliberately. Work through the asset map in catalog order. For makeup, match the exact shade rather than selecting the nearest-looking swatch; for size variants, verify the package depicted.
Save and document the mapping. Select Save where changes require saving, then mark the variant as assigned in the handoff sheet. Keep assignment status separate from the later storefront check.
Products with several option combinations need explicit decisions. If a fragrance varies by scent and size, decide which photograph represents each combination rather than assuming a scent-only image explains every package.
Expected result: Each configured variant has the intended image assignment in Shopify. The storefront check will confirm whether your theme displays that assignment as intended.
Do not promise a shade-specific gallery based only on assigning a variant image. Shopify’s variant assignment and your theme’s handling of the remaining gallery are different parts of the implementation.
Storefront approval
The final configuration unit tests what a customer actually sees. Admin thumbnails cannot establish how a theme crops images or responds to variant selection.
Open the storefront preview. Use Preview from the product editor. Check that you are reviewing the intended product and theme, especially if a launch uses an unpublished theme.
Inspect the lead image. Confirm that the bottle, cap, label, and shadows fit the visible frame. Compare the product-page gallery with its collection-card presentation; those placements can use different crop behavior.
Test the variants. Select every relevant shade, scent, or size. Confirm that the displayed image matches the selected option and that the remaining gallery does not misrepresent the selection.
Review different screens. Check a desktop browser and a physical phone. Inspect label readability, gallery interaction, image zoom where available, and whether any text placed inside the photograph becomes unreadable.
Record approval. Log the reviewer, review date, product identifier, and unresolved issues. Release the listing only after the person responsible for product accuracy signs off.
Expected result: The listing passes product-identity, crop, gallery-order, and variant checks on the actual storefront. Your 2026 launch record identifies exactly what was approved.
The full sequence is Asset map, Web exports, Product media, Variant mapping, Storefront review. Each stage closes a different error path; skipping the final review leaves theme behavior unchecked.
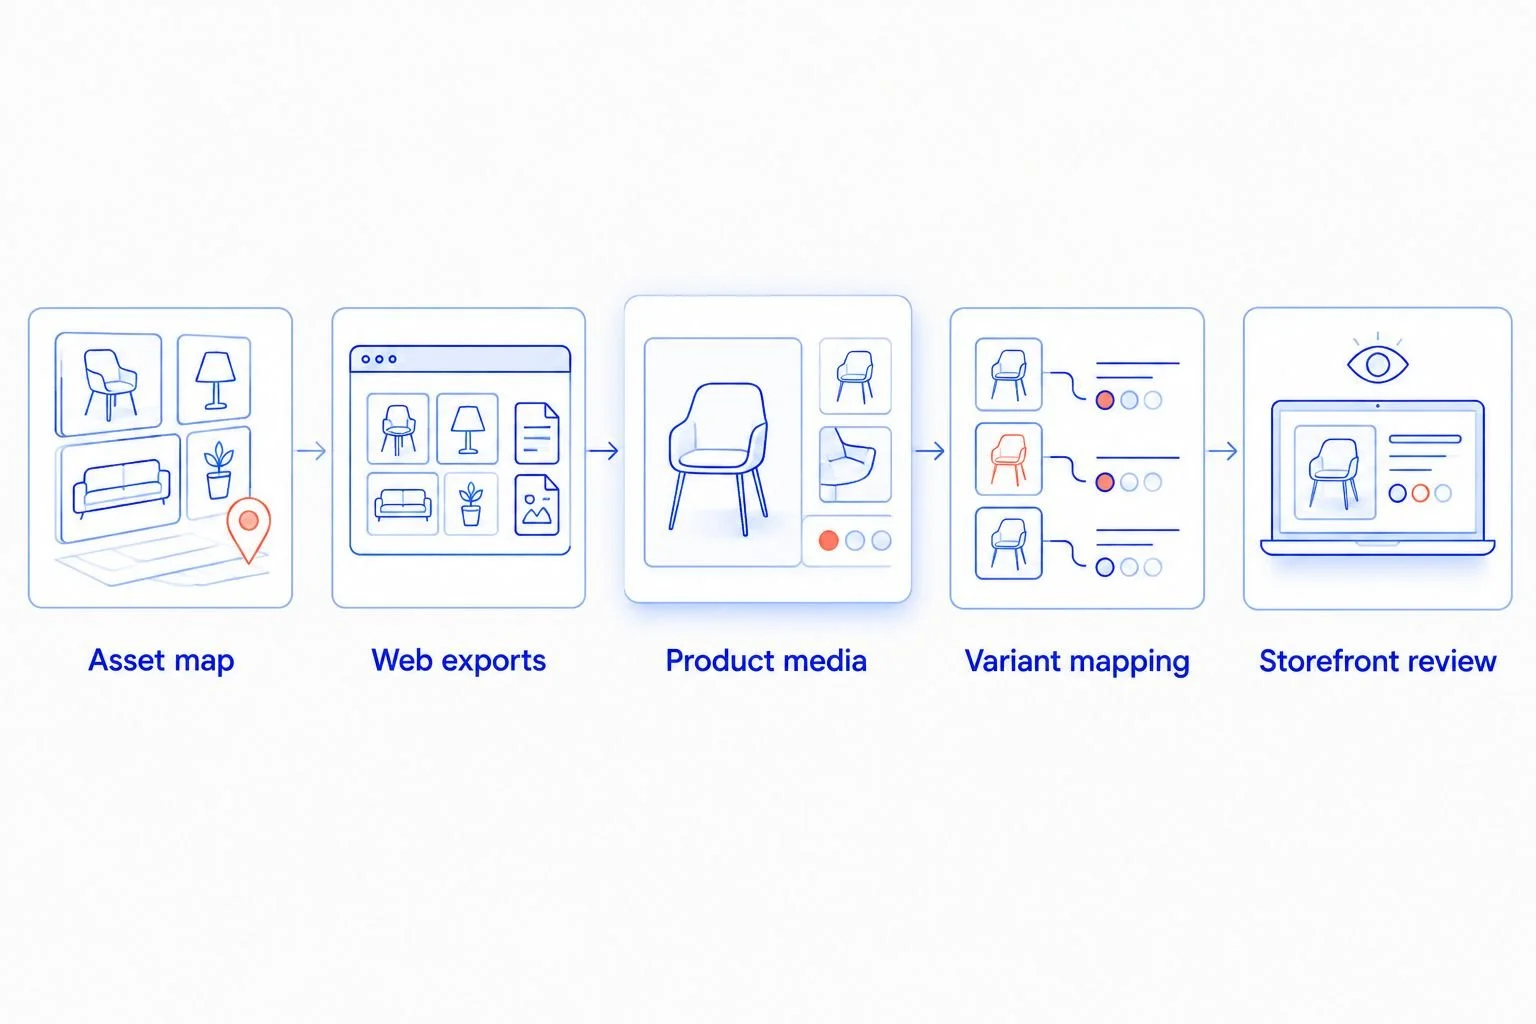
Variant mapping follows upload, and storefront review confirms the customer-facing result.
Update listings when photography changes
A packaging refresh needs a replacement workflow, not another upload added to an already crowded gallery. Use this variant when approved photography changes but the underlying product remains the same.
Compare the new files with the existing asset map and identify which images they replace.
Upload the approved replacements to the existing product without immediately deleting the previous media.
Set the new order, update alt text, and reassign affected variants to their replacement images.
Review the storefront, then remove obsolete product media after approval. Retain the original files in your external archive.
Keep old and new packaging from becoming an accidental mixed gallery. If both packages need explanation, make that an explicit merchandising decision rather than an upload leftover.
For a 2026 refresh, record the packaging version alongside the file approval. A date alone does not explain which label design or component the image represents.
Troubleshooting
The wrong shade appears after selection
Check the variant’s image assignment against the asset map first. If the assignment is correct, inspect the theme’s variant-media behavior; uploading another copy of the image will not repair a display rule.
The product is cropped on mobile
Compare the source image with the theme’s image container and crop settings. Add breathing room in a new export or adjust the display setting, then retest both the product page and collection card.
Packaging text looks soft
Inspect the exported image at its intended display size. Re-export from the approved master with less destructive compression or a more suitable resolution; enlarging an already softened file does not restore label detail.
The upload is rejected or never finishes
Check Shopify’s current supported formats and upload limits, then inspect the file for corruption. Try a fresh JPEG or PNG export, confirm your product-editing permissions, and retry before changing unrelated theme settings.
Old images remain after a refresh
Compare the product’s Media section with the approved replacement list. Confirm the new variant assignments before removing obsolete images, then reload the storefront to distinguish saved media changes from a stale browser view.
Customize your workflow
Expand the asset map when the same shoot serves email, paid social, wholesale, or other storefronts. Keep Shopify-ready exports separate from campaign crops so channel-specific files do not enter the product gallery by mistake.
The beauty photo campaign deliverables checklist helps structure that broader handoff. Define the destination, image role, crop, and approval owner before production begins.
For a brief to Courtney Dailey Photography, separate cosmetic product photography needs from campaign storytelling. Request the images your listing needs, and agree the deliverables with the photographer rather than assuming every campaign photograph will work as a packshot.
Review beauty photography for your brief
Explore beauty campaign and cosmetic product photography before defining your Shopify shot list.
FAQ
What is the best Shopify product photography upload workflow?
Use an approved asset map, upload web exports to the correct product, assign variant images, and review the storefront before release. Keeping upload status separate from approval status prevents unfinished listings from being treated as ready.
Should I upload JPEG or PNG product photos to Shopify?
Use JPEG for ordinary opaque photographs and PNG when the layout needs transparency. Inspect exported packaging text and transparent edges before approving either format.
What image dimensions should I request for a Shopify beauty listing?
A 2000-pixel square export is a practical starting specification for a square gallery, not a universal Shopify requirement. Confirm the dimensions and crop against your actual theme before requesting the full export batch.
Does Shopify automatically match product photos to makeup shades?
Do not rely on uploading a photograph to assign it to the correct shade variant. Set the variant image relationship in the product editor and test the selection on your storefront.
Can the same photographs work for a campaign and a product listing?
The same photograph works only when its framing and content serve both placements. A campaign composition can need a separate crop or additional packshot to make the product clear in a listing.
How do I replace product photos after a packaging redesign?
Upload the approved replacements, update gallery order and variant assignments, then review the storefront before removing obsolete media. Keep archived originals outside Shopify for reference.
Who is Courtney Dailey Photography best for?
Courtney Dailey Photography is best for beauty brands and agencies seeking specialized beauty campaign and cosmetic product photography. The Los Angeles-based photographer specializes in luxury skincare, makeup, and fragrance campaigns.
One last thing
Approve the smallest meaningful presentation, not just the largest image. A bottle that reads clearly in a retouching preview can lose its identity inside a small collection card.
Before closing your 2026 handoff, have someone compare the listing against the actual approved package reference. That final identity check is more useful than another round of aesthetic adjustments to an already approved photograph.